Showing posts with label DIY. Show all posts

DIY Survival Gear Tips - Keeping Things Simple

If you find yourself in a survival situation, every person needs to be able to use what they have on hand and take full advantages of what may be limited resources to satisfy their needs.  Each of your resources will have unique advantages and disadvantages. Your main task should be to figure out how to use these items to meet your needs and increase your chances of survival. Here are some simple tips to remember when making DIY survival gear.

DIY Survival Gear Tips

1. Use only the minimum resources necessary.

Making DIY gear is a great way to train yourself to find alternative uses for items to meet these needs. It is important to keep things simple because this often makes things easier to accomplish. It will also help to reduce the amount of your available resources that will have to be used to make your goal a reality. The less hardware that you need to accomplish your project will increase your ability to achieve a successful outcome with limited resources.

2. Use your survival needs as a guide.

Need is a great motivator. Combining a need with a little imagination can usually lead to a successful project. In a survival situation, failure is not an option and simple solutions often work best.

3. Limit your use of power tools and electricity.

Hand tools work even when there is no power available. Try to design your DIY projects to minimize the use of electricity and the need for power tools. If the grid goes down, hand tools may be your only option to complete your project. You don’t want your thinking to be dependent upon grid power that may not be available.

4. Keep your projects simple and uncomplicated.

Complexity can create more problems than it solves. If you make your projects simple and uncomplicated, other family members can assist in the creation and development of any survival gear you may need. If a project is designed with simplicity in mind, you can free up your time to work on other projects. Children and senior family members can also contribute to the process of making needed survival items if you keep things simple.

5. Remember the primary goal of your project.

Your goal should be to create DIY projects that require minimal tools, no electricity, and minimum amounts of hardware or resources. This will help you be better prepared.

Got DIY survival projects?

Staying above the water line!


Riverwalker

DIY RV Project - Exterior Utilities Hook-up Light


Many times you will find yourself trying to hook up the utilities to your RV at dark thirty. Installing an exterior light on your RV will make the task a lot simpler. It doesn’t matter if you are boondocking or hooking up to a park space. You may find yourself in the dark and fumbling around with a flashlight. An exterior light will leave your hands free to make the process of getting things hooked up a lot easier.

Using a $10 light from the local tractor supply outlet and about 8 feet of two strand 12 volt wire is all you need to accomplish this RV mod. The cover for the power cord was removed and a wire was run from the 12 volt connections inside the RV.  A small hole was then made in the side of the RV for the wire after a suitable location for the light was determined. A piece of coat hanger wire was then snaked behind the siding of the RV until it came out at the side of the electrical cord cover opening. The wire was then hooked to the 12 volt electrical wire and pulled through the hole. It was then a simple process of hooking the wires to the light and mounting the base plate to the side of the RV and installing the light cover.


The light included an on/off switch and the cover was mounted with the switch in the down position. Even though the switch was water resistant, mounting it where it was on the bottom helps avoid rain hitting it directly.

It’s a quick and simple RV mod that can be done in less than an hour.

Got RV mod?

Staying above the water line!


Riverwalker

Solar Garage Project


Pole-mounted Solar Panels

The conversion of my garage to solar power is completed and hopefully it will lower my utility bill. It took a while to get everything set up and working. My panels were pole mounted in order to make it easier to service the solar panels.


A total of four 100 watt solar panels were used to charge a battery bank of four 100 amp hour batteries. Two inverters were used to furnish power. A 100 watt pure sine wave inverter was used for lights and to power a small air compressor. An 1800 watt pure sine wave inverter was set up to furnish power for my power saws. This covers the majority of my power usage in the garage. I’ll also being running a fairly low wattage heat lamp for the chickens in the winter.


A solar panel kit from Grape Solar was used for this project and came with most of the necessary wiring, a charge controller and an inverter. There is additional information posted in my product review. A separate grounding rod was installed on the panels and the solar disconnect that was installed.

My grid-powered outlets are still functional and can be used if my solar power system goes down for some reason but won’t be used unless absolutely necessary. With the completion of this project, my storage shed, greenhouse and garage are now on solar power.

Part Two will show my battery bank, solar disconnect and charge controller set-up.

Got solar-powered garage?

Staying above the water line!

Riverwalker

RV Boondocking Project - DIY Installation for a Reverse Light


One of the most difficult tasks when boondocking is backing your RV into a suitable area. This can be made even more challenging if you don't have reverse lights on your RV and it's starting to get dark. In many cases, In our case, we usually don't reach our destination until it's gotten pretty late in the day. Without decent back-up lights, you could risk serious damage to your RV.

RW, Jr.'s RV didn't have any reverse lights and it really made it difficult to back-up when there wasn't much daylight left. To remedy this problem, I installed an LED spotlight on the spare tire carrier on RW, Jr.'s RV. If we wind up getting set up late in the evening, we don't have a problem because of a lack of daylight.


.The main obstacle was making a mounting bracket for the light. Replacing the existing taillights with ones that incorporated reverse lights was a pretty expensive proposition and they wouldn't have provided very much additional light. Standard reverse lights aren't very bright and wouldn't be a lot of real help when it gets dark.

I used an old aluminum bracket and a piece of 1/2" electrical conduit that was in my junk pile to fabricate a mounting bracket. It only required a couple of holes to be drilled in the spare tire mounting bracket to attach the light. I mounted it in a centered position that enabled the light to be used to its maximum advantage. This gave the maximum amount of light coverage.  


The light was wired directly into the trailer wiring harness to the reverse light wire which hadn't been hooked up. Now RW, Jr has a spotlight that works any time he is backing up his RV. He can also see me when I'm guiding him into place if it's dark. I used a  10 watt 12 volt  DC LED Floodlight for the reverse light. It's water-proof and puts out a lot of light.

Got boondocking light?

Staying above the water line!


Riverwalker


Stay Safe from Summer Storms with These DIY Home Projects

Every day, hundreds of lightning bolts crash down from the heavens onto the earth below. For the Scandinavians, just as thunder was the embodiment of Thor, lightning was the embodiment of the hammer he used to protect humans from the ever-present threat of giants. These days, there may be fewer giants in the woods, but menacing electrical storms can still wreak havoc on your property. Luckily there are many small things you can do around your home to prepare it for the worst.

1. Remove Debris: Broken branches, building materials, lawn furniture, or other loose items around your home have the potential to become dangerous projectiles in the midst of a storm. Take time to assess your backyard and complete any tree removal or limb-trimming you feel is necessary.

2. H2O to Go: If a severe electrical storm is in the forecast, your power grid and city water system might both be at risk of going down. Fill up buckets, bottles, and even your bathtub for washing and drinking. Ice bags in the freezer can also help- a couple days without power may cost you a couple hundred bucks in rotten food. Fill freezer bags with water and keep them in the freezer, then use them in the event of a blackout to help food stay cold longer. When they thaw out, you’ve got clean drinking water. Before the storm, you can also make a rainwater collection system for very little money and store hundreds of gallons of water to use for your garden, plumbing, or other uses.

3. Repair Your Roof: In order to prevent leaks and severe damage to your roof during a downpour, you should carefully inspect your roof gutters and shingles. Doing minor repairs early on is much better than cleaning up the after-effects of indoor flooding. Start by examining chimneys, skylights, and plumbing vents for moisture. Look for algae stains on interior plywood, wet insulation, or rust around nails, since these are some telltale signs of leaks.

4. Solar Sump Pump: For remote areas needing pumping without access to power, a sump pump with solar batteriescan provide the answer. Install a couple of small solar panels to charge the portable water pump’s batteries, and you can go “off the grid” with your portable pump. Some people live in areas where storms may leave them without access to a working electrical grid for weeks or even months; in these cases, it can be very useful to have a battery backup to keep solar electricity in reserve for nights and cloudy days. Solar energy is catching on among many in the United States, and in Canada you can even find alternative eco-friendly energy plans through various informational websites that can let consumers bypass main fossil-fuel based providers altogether.

5. Fill Your Gas Tank: Keep a full propane tank handy so that you and your family can still enjoy a hot meal if you have a gas grill and meat in the freezer. In times of lengthy outages, you can always grill the contents of your fridge before the food spoils. Filling your car with gas before a storm allows you to turn it into an additional survival tool. Cars can be used to charge cell phones, provide heat, and even function as a generator with a power inverter. Your car is also your means of emergency transport and without power, gas stations in your area will be unable to help you refill your tank.

Each storm is unique, and presents its own unique set of challenges, but having some survival tips in mind can help put the odds in your favor. With all the time and money you’ve invested into your property, being prepared is just plain common sense.

Beth Kelly is a freelance blogger from the Midwest and the author of this guest post.

Thanks go out to Beth for some great tips.

Staying above the water line!


Riverwalker

DIY Gear - Off Grid Power Tools


Off Grid Power Tools

Battery packs can be expensive and the chargers for them can also fail to recharge the battery packs sufficiently. Sometimes you have to use a direct solution to solve a problem. In this case, a small portable drill that operates on 12 volts was modified to work directly off a 12 volt source such as a car or tractor battery. Include a short extension cord and you are good to go.

Got off grid power tools?

Staying above the water line!

Riverwalker

DIY Solar Project - Portable Water Pump - Part Two - Assembly and Accessories


In Part One the basic planning for making a portable water pump was covered. The actual project assembly closely followed my initial plan and only a few changes were made from the original design plan.  Most of the changes in the original plan were made in order to enhance the functional operation of the portable water pump or to simplify its use.

Building a DIY Portable Water Pump - Assembly and Accessories

1. Portable Power Options - Using Solar Panels 

One of the best ways to keep any system portable is to have a convenient power source. While the choice to use battery power was inevitable, using solar panels to keep that battery power maintained would keep the system portable and there would be no need for a grid connection.

 Once a decision was made to use a couple of small solar panels to charge the portable water pump’s batteries, it became a simple task to install the panels. I didn’t want a system where you had to worry about hooking up a remote solar panel with wires running to it. A self-contained system was going to be easier to use and make things less complicated.

It turned out that two small 12 volt solar panels could be easily attached to the handle of the rolling tool box and still leave plenty of room to grip the handle. The handle was also able to be completely folded in the down position without any additional interference.


Another advantage of this set-up was that a tab stop on the handle allowed the mounted solar panels to be angled in a manner that increased the exposure of the solar panels to the sun. 


Installation of the small solar panels was a simple matter of drilling four holes in the handle and bolting the solar panels to the tool box handle.

2. Mounting the Water Pump


The water pump was then mounted to the bottom of the included toolbox storage tray. It would have been nice if the tray had offered a flatter surface on the top side. This would have made it easier to mount the pump to the tray. As a result, the pump was mounted to the underside of the tray which had a relatively flat mounting surface. I also didn’t want to leave the tray out as this would leave less storage options and also allow a set of pliers or a screwdriver to be kept handy.  


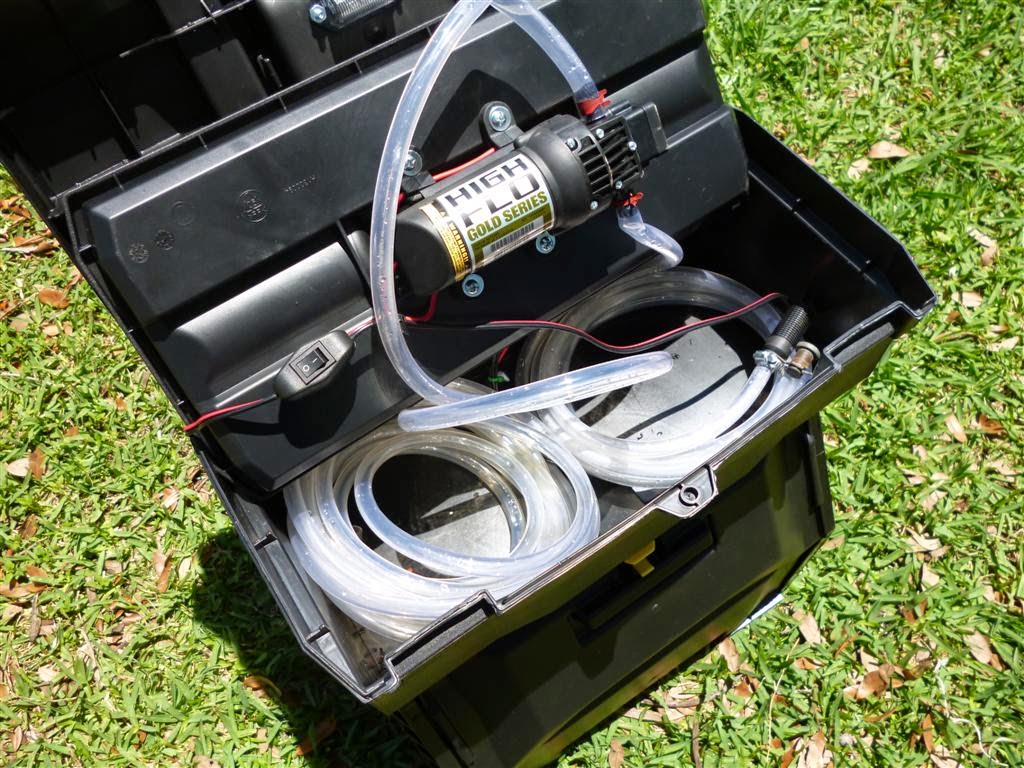
Keeping the pump mounted above the floor of the upper toolbox also allowed room for storage of the suction and discharge hoses. There is enough room for 30 feet of discharge hose and 10 feet of suction hose to be stored in the bottom of the toolbox. It was a simple task to flip the tray over in order to use the pump and deploy the suction and discharge hoses.


There were two minor problems encountered with the hoses. The first was a small weight needed to be added to the suction hose because the weight of the debris strainer  was insufficient to keep the end of the suction hose submerged. The other problem was kinking hoses caused by the pump design. This was solved by adding an elbow to the suction and discharge outlets of the pump.

Testing the pump found it to have a minimal current draw of slightly more than 2.5 amps and a surge draw of about 4 amps until the pump was primed. This is low enough that it shouldn’t place a significantly large burden on the batteries.

3. Installing the Batteries


The lower bin of the rolling toolbox offered space that could be utilized to hold a battery (or batteries) depending upon their size. Other versions of this toolbox offered a removable upper toolbox and a lower bin that was capable of holding a larger battery. The lower bin on this model of toolbox did not offer sufficient room to hold a larger deep-cycle battery (Group 24 or 27?). This also would have increased the weight factor significantly and ultimately affected its portability.


Four 6 volt / 13 amp hour AGM batteries were mounted in the bottom bin. They were wired in series and parallel and would supply ample power to the pump. A small piece of 2X4 lumber was used on each end of the bin to secure the batteries in place. The AGM batteries were also able to be mounted in any configuration since they are sealed units. The cost of batteries could have been cut in half by using only two to power the pump but I felt the additional reserve power offered by using four batteries was worth the additional cost.


There was also sufficient storage space left in the bin to hold a few additional items. These items included a grid charger, an external power supply hook-up and a bag of spare hose parts.

4. Installing the Solar Charge Controller


In order to avoid the possibility of cooking the batteries, a solar charge controller was mounted in the lower bin of the toolbox. The charge controller was mounted using Velcro patches to avoid having to work in a confined space and dealing with the real possibility of accidentally shorting the wrong wire, This made it easy  to detach the controller from the inside of the bin and pull the unit into the open to add or remove wiring as necessary.

5. Accessories


Four switches were installed on the lower sides of the toolbox to control various functions. These were a power switch that cut the main power to the charge controller and pump, a charge switch that disabled the charging function of the solar panels, a switch for an optional light was added in case it got dark before the water pumping chores were completed and a voltage switch was also included to indicate battery status without a continuous display from the voltage meter creating an additional strain on the batteries.

There could have been additional cost savings by using simple toggle switches which are considerably cheaper than the chrome plate switches actually used in the project.


The addition of a small work light added increased functionality should working conditions not have ideal lighting circumstances. This light was wired directly to the batteries and was operated with the simple flip of the switch. This allows any pumping chores to be completed even if you don’t finish before it gets dark.


An external 12 volt 120 watt plug was added to give the added option of using a larger external battery as a power source for extended operational capabilities of the pump. It can also be used to power other 12 volt accessories as needed. This was wired directly to the batteries and was protected with a 10 amp fuse.

It is important to note that it would perhaps have been better to mount the batteries in the top and the pump in the bottom. Unfortunately, this would have made the toolbox even more top-heavy that it was originally. The weight of even two small batteries would exceed the weight of the pump and make the toolbox even more unstable. Placing the batteries in the bottom section made the toolbox quite stable.

While this project cost approximately $200 to make and was completed with all new parts, it doesn’t need an extension cord to make it work. It can also go where and when it’s needed very easily. There are also areas where the costs can be decreased (batteries, switches or other accessories) and place this type of portable pump on a similar cost basis with a grid-dependent water pump.

There is one additional note about the portability of this unit. The total weight as assembled was slightly more than 25 pounds and this made it quite easy to lift over obstacles or be easily pulled over rough terrain on its wheels.

Got portable pumping power?

Staying above the water pumping line!


Riverwalker

DIY Solar Project - Portable Water Pump - Part One - Basic Planning


The practical application of your knowledge should be the goal of any DIY project you may decide to undertake. A DIY project can be a simple solution to a major problem. If you just give it some careful thought and a little basic planning, you can find a solution that will solve the problem.

 Mrs. RW had a big problem in getting water from our rain barrels to her plants. With numerous rain barrels (and plants) in different places and spread out over a couple of acres, Mrs. RW needed some way to get the rain water that was collected to her plants without having to pack a jug or bucket. The solution was fairly simple. A portable water pump was needed to move the rainwater to the plants.

Building a DIY Portable Water Pump - Basic Planning


1. Choosing a Portable Platform

A decision was made to use a Stanley Mobile Work Centerfor the platform to build a portable water pump. It was fairly inexpensive and cheap enough to scrap the whole thing if the project went south. This is the case in many instances in my DIY projects and more often than you might think. It also offered a large storage bin that would be ideal to house a battery that would be needed to run the pump and it also had a folding handle that would also work great for this DIY project. The top toolbox also offered a decent amount of storage. Although the sliding door to the bin sometimes comes off its track, the door is easy enough to put back on its track. It has wheels and a fairly strong axle to accommodate the weight of any items stored in the bin and the tool box. The next step is choosing a power source.


2. Choosing a Portable Power Source

Any portable water pump is going to need a power source and grid plugs and gasoline aren’t always available. Consider that a good grid-powered water pump can cost upwards of $150 and one powered by a two or four cycle engine can cost several hundred dollars or more. This made the decision to use 12 volt power easy. The problem would be keeping the battery or batteries charged. Since the pump’s primary use would be in the daytime, a little solar action would take care of keeping the batteries charged.

Several battery options were considered. When a large deep cycle battery (24 series) wouldn’t fit and was way too heavy for the toolbox, a smaller and lighter battery option was needed. Four 6 volt / 13 Amp Hour AGM (absorbed glass mat) batteries were purchased on special for less than $60. This solved the problem as far as powering the portable pump. Using a couple of 12 volt (2.5 watt) solar panels that were purchased for less than $10 each would solve the problem of keeping the batteries charged. A solar charge controller would also be needed to protect the batteries from being overcharged and to regulate the load that would be placed on the batteries.


3. Choosing a Portable Water Pump

Several features were going to be needed for our portable water pump to get the maximum use and benefit out of a portable system. A 12 volt water pump with a flow rate of 1.2 GPH (gallons per hour) with a pressure of 35 PSI was decided as the best option. The pump would also need to be lightweight and with a very minimal current draw to prevent exceeding battery capacity. It also needed to be cost effective and allow for the maximum size possible for our toolbox platform.

Suction and discharge hoses can also take up a lot of space and greatly increase the weight factor. The size of the discharge and suction ports on the water pump should be a major factor when choosing a pump. The pump in this case had 3/8 inch ports which were suitable for this application.


4. Choosing Accessories

There are also additional accessories that may be needed in order to minimize any problems with your portable water pump. Some are required for safe and efficient operation. Others are optional and can be used or not used depending upon personal preferences. Fuses, switches, disconnects and battery monitors are just some of the items that are required for a safely functioning system.

With a platform, water pump, power source and the accessories chosen, the only thing left was to put all the pieces together and hopefully end up with what should be an extremely versatile and useful piece of equipment.


In Part Two, the actual details of building the portable water pump will be outlined. The manner in which problems were handled and the solutions that were chosen to deal with the problems encountered during the build process will also be covered.

Got pumping power?

Staying above the water pumping line!
                                                                                       

Riverwalker

New Solar Project


New Solar Project

I have a new DIY project in the works. When it's completed, I'll be posting an update on the project. Waiting on a few miscellaneous parts to complete the final assembly.

Got DIY project?

Staying above the water line!

Riverwalker

DIY Solar Shed Project


Solar Panels

With my new storage shed finally completed, it was time to power it up.  Conventional electrical power was going to be quite expensive to run electrical to my new shed because it wasn't very close to any existing conventional electrical power. Without any inside wiring, it was going to cost between three and five hundred dollars for a grid hook-up and I chose going the solar route as a cheaper alternative.

In the picture above are three 10 watt solar panels that were purchased on a close-out special for $29 each. Total cost of the solar panels was $87 plus tax. The panels also came with several additional cables that were cannibalized to wire up my system.


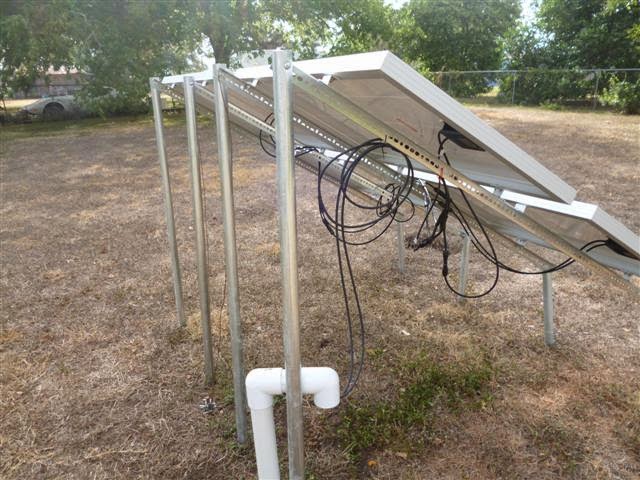
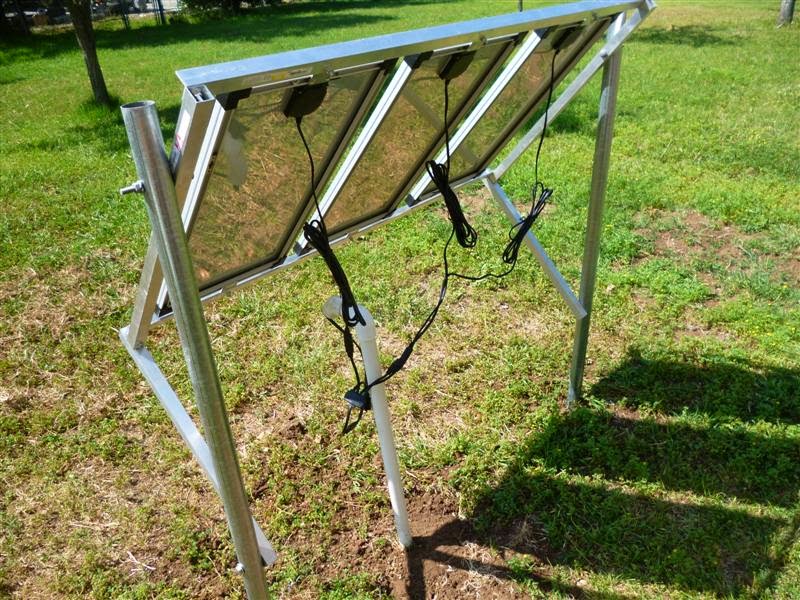
The above pictures show the mounting that was fabricated for the solar panels. The posts are standard chain link line posts (5 1/2 foot). The mounting frame was made from two pieces of one inch aluminum square tubing and two pieces of one inch aluminum angle brackets. All pieces were four foot in length.  The total cost for this was slightly less than $40 but did require some time and effort to put together. A Battery Tender 25' Quick Disconnect Extension Cable  was used to feed the solar panel output into the shed. The cost of the additional extension cable was about $13. A NOCO ISCC2 5-Way SAE Adapter Connector at a cost of about $5 was used to connect the solar panels together. 


This is the underground pipe that feeds the extension cable into the shed. The cost of pipe and fittings was less than $20. The solar panels were only about ten feet from the rear of the shed. They were mounted to keep shade from the roof blocking the solar panels and to avoid rain  from the roof falling directly onto the solar panels.


The above picture shows the charge controller in operation. An HQRP 20A Solar Panel Battery Charge Controller  was chosen because the primary function of this system was to supply light to my shed and this charge controller works well for this purpose. The cost of the controller was slightly less than $30.


The above picture shows the in-line fuse of my connection to the battery from my controller. This is a Battery Tender Ring Terminal Harness with Black Fused 2-Pin Quick Disconnect Plug that connects directly to the solar charge controller. The positive cable in the picture runs to a small 400 watt inverter.


This picture shows my 100 amp battery ( Walmart brand ... $75) and my 400 watt inverter. The inverter is going to be used to power a small fan when working in the shed. The cost of the inverter was $25. It's big enough for it's planned use but a bigger inverter may be added later as money permits.


This is the Cobra 400-Watt 12-Volt DC to 120-Volt AC Power Inverter  that is being used in my system. I used larger cables than came with the unit to lessen current loss and avoid over-heating from using cables that I felt are too small to handle even the light loads that may be placed on this unit. My plans are to not exceed 50% of capacity as a safety precaution and to prevent damaging the inverter. It includes a USB charging port.


This is the charge controller during a load test. In the picture, you can see where the SAE connector to the solar panel input has been disconnected. This triggers the sensor on the charge controller which then opens current to the load connections. This causes the LED light  to turn on.


This is a SainSonic CMP12-10A Solar Charge Panel battery Controller Regulator 10A 12V/24V Auto Switcherspare controller that was purchased as a back-up unit. Just in case!


Any solar power system should be designed for your needs and in such a manner that you don't place unnecessary strain on your equipment. This will insure that it is capable of meeting your requirements. With a little time and effort and slightly more than $250, this system satisfies my needs and should give me good service for an extended period of time. It also doesn't add to the cost of my grid service.

Special thanks go to RW, Jr. who built the shelf that was used hold all the equipment (battery, inverter, charge controller, etc.) and for digging the post holes. 

Got solar?

Staying above the water line!

Riverwalker
Older Post ►
 

Copyright 2011 stealth survival is proudly powered by blogger.com