In Part One the basic planning for making a portable water pump was covered. The actual project assembly closely followed my initial plan and only a few changes were made from the original design plan. Most of the changes in the original plan were made in order to enhance the functional operation of the portable water pump or to simplify its use.
Building a DIY Portable Water Pump - Assembly and Accessories
1. Portable Power Options - Using Solar Panels
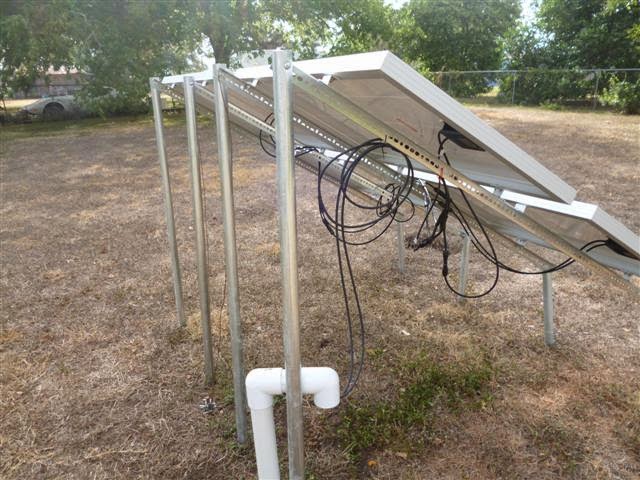
One of the best ways to keep any system portable is to have a convenient power source. While the choice to use battery power was inevitable, using solar panels to keep that battery power maintained would keep the system portable and there would be no need for a grid connection.
Once a decision was made to use a couple of small solar panels to charge the portable water pump’s batteries, it became a simple task to install the panels. I didn’t want a system where you had to worry about hooking up a remote solar panel with wires running to it. A self-contained system was going to be easier to use and make things less complicated.
It turned out that two small 12 volt solar panels could be easily attached to the handle of the rolling tool box and still leave plenty of room to grip the handle. The handle was also able to be completely folded in the down position without any additional interference.
Another advantage of this set-up was that a tab stop on the handle allowed the mounted solar panels to be angled in a manner that increased the exposure of the solar panels to the sun.
Installation of the small solar panels was a simple matter of drilling four holes in the handle and bolting the solar panels to the tool box handle.
2. Mounting the Water Pump
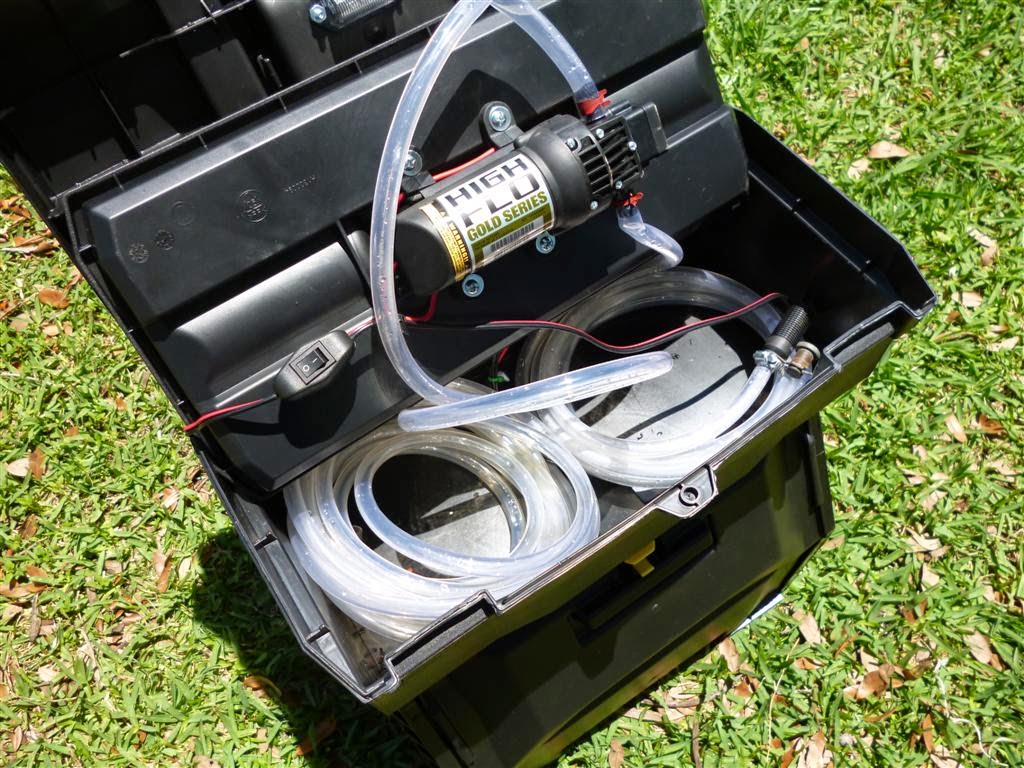
The water pump was then mounted to the bottom of the included toolbox storage tray. It would have been nice if the tray had offered a flatter surface on the top side. This would have made it easier to mount the pump to the tray. As a result, the pump was mounted to the underside of the tray which had a relatively flat mounting surface. I also didn’t want to leave the tray out as this would leave less storage options and also allow a set of pliers or a screwdriver to be kept handy.
Keeping the pump mounted above the floor of the upper toolbox also allowed room for storage of the suction and discharge hoses. There is enough room for 30 feet of discharge hose and 10 feet of suction hose to be stored in the bottom of the toolbox. It was a simple task to flip the tray over in order to use the pump and deploy the suction and discharge hoses.
There were two minor problems encountered with the hoses. The first was a small weight needed to be added to the suction hose because the weight of the debris strainer was insufficient to keep the end of the suction hose submerged. The other problem was kinking hoses caused by the pump design. This was solved by adding an elbow to the suction and discharge outlets of the pump.
Testing the pump found it to have a minimal current draw of slightly more than 2.5 amps and a surge draw of about 4 amps until the pump was primed. This is low enough that it shouldn’t place a significantly large burden on the batteries.
3. Installing the Batteries
The lower bin of the rolling toolbox offered space that could be utilized to hold a battery (or batteries) depending upon their size. Other versions of this toolbox offered a removable upper toolbox and a lower bin that was capable of holding a larger battery. The lower bin on this model of toolbox did not offer sufficient room to hold a larger deep-cycle battery (Group 24 or 27?). This also would have increased the weight factor significantly and ultimately affected its portability.

Four 6 volt / 13 amp hour AGM batteries were mounted in the bottom bin. They were wired in series and parallel and would supply ample power to the pump. A small piece of 2X4 lumber was used on each end of the bin to secure the batteries in place. The AGM batteries were also able to be mounted in any configuration since they are sealed units. The cost of batteries could have been cut in half by using only two to power the pump but I felt the additional reserve power offered by using four batteries was worth the additional cost.
There was also sufficient storage space left in the bin to hold a few additional items. These items included a grid charger, an external power supply hook-up and a bag of spare hose parts.
4. Installing the Solar Charge Controller
In order to avoid the possibility of cooking the batteries, a solar charge controller was mounted in the lower bin of the toolbox. The charge controller was mounted using Velcro patches to avoid having to work in a confined space and dealing with the real possibility of accidentally shorting the wrong wire, This made it easy to detach the controller from the inside of the bin and pull the unit into the open to add or remove wiring as necessary.
5. Accessories
Four switches were installed on the lower sides of the toolbox to control various functions. These were a power switch that cut the main power to the charge controller and pump, a charge switch that disabled the charging function of the solar panels, a switch for an optional light was added in case it got dark before the water pumping chores were completed and a voltage switch was also included to indicate battery status without a continuous display from the voltage meter
 creating an additional strain on the batteries.
There could have been additional cost savings by using simple toggle switches which are considerably cheaper than the chrome plate switches actually used in the project.
The addition of a small work light added increased functionality should working conditions not have ideal lighting circumstances. This light was wired directly to the batteries and was operated with the simple flip of the switch. This allows any pumping chores to be completed even if you don’t finish before it gets dark.
An external 12 volt 120 watt plug was added to give the added option of using a larger external battery as a power source for extended operational capabilities of the pump. It can also be used to power other 12 volt accessories as needed. This was wired directly to the batteries and was protected with a 10 amp fuse.
It is important to note that it would perhaps have been better to mount the batteries in the top and the pump in the bottom. Unfortunately, this would have made the toolbox even more top-heavy that it was originally. The weight of even two small batteries would exceed the weight of the pump and make the toolbox even more unstable. Placing the batteries in the bottom section made the toolbox quite stable.
While this project cost approximately $200 to make and was completed with all new parts, it doesn’t need an extension cord to make it work. It can also go where and when it’s needed very easily. There are also areas where the costs can be decreased (batteries, switches or other accessories) and place this type of portable pump on a similar cost basis with a grid-dependent water pump.
There is one additional note about the portability of this unit. The total weight as assembled was slightly more than 25 pounds and this made it quite easy to lift over obstacles or be easily pulled over rough terrain on its wheels.
Got portable pumping power?
Staying above the water pumping line!
Riverwalker